Soft Dinner Rolls (VIDEO)

This post may contain affiliate links. Please see our privacy policy for more details.

Dinner rolls at home and even better.

Never buy dinner rolls again!! Easy 7 ingredient soft dinner rolls – they practically melt in your mouth. If you’re looking for a fool-proof recipe, this is the one. Typically served as a side dish, these buttery soft petite rounds are just as irresistible on their own. Brushed with honey butter and sprinkled with flaky sea salt, all I have to say is good luck eating just one.

Table of Contents

Why you'll love my recipe.

Quick and easy preparation

Directions are very straightforward and easy to follow. You will be blown away at how amazing it will turn out on your first try!

Extremely soft and fluffy

It doesn’t get softer than this. Each roll is so fluffy, it practically melts in your mouth with every bite.

Healthier than store bought

Did you know a typical store bought bread has over 15 ingredients?! Most of which contain additives, emulsifiers and preservatives. My recipe has only 7 wholesome and fresh ingredients. Never any extra stuff.

Ingredient notes.

Flour

Bread flour is preferred and works best. My brand is imported from Canada and I purchase it from a local wholesale store but Costco has some great options too. Read more about the different types of flour here.

Milk

Whole milk works best but may substitute with 2%.

Salt

Adds a little flavor to the bread. I rarely ever use table salt in my recipes. When you see salt, think sea salt. Table salt often contains additives and anti-caking agents, which affects quality of your baked goods. Table salt is also saltier and is not an equal substitute for other salts. 

Yeast

This recipe uses instant yeast but you may use active dry yeast instead. See my notes in the recipe for special instructions. Read more about the different types of yeast here.

Butter

Adds moisture and creates a tender crumb.

Honey

Honey has many important jobs in this recipe. It contributes to the golden crust, adds slight flavor and helps naturally slow down mold growth.

Egg

Eggs add richness and a tender crumb, providing structure and shape to the rolls.

Brushing egg wash in dough.

What type of yeast should I use?

This recipe uses instant yeast but you may use active dry yeast instead. See my notes in the recipe for special instructions. You can substitute one for the other at a 1:1 ratio but keep in mind, proofing time will differ. Read more about the different types of yeast here.

How to activate yeast.

If using active dry yeast, first measure 240ml or 1 cup of the warm milk from the recipe in a wide mouth cup or bowl. Add in a teaspoon of sugar and sprinkle the yeast on top. Whisk together to combine and let it sit for 5-10 minutes until foamy and bubbly on top. Then, add to the dry ingredients, along with the remainder of the water and proceed with baking directions. For extended instructions, see Active Dry Yeast vs. Instant Dry Yeast blog post.

Sample schedule.

Room temperature first rise, room temperature second rise.

Once the dough is mixed, transfer to a large bowl. Lightly coat the bowl and surface of the dough with oil. This prevents the dough from sticking to the sides and allows it to rise without restraint. Cover the bowl with loosely plastic wrap and leave it in a warm spot to proof for 1 to 1½ hours until doubled in size. The second rise in the baking pan may only take 40 minutes but up to 1 hour, depending on the temperature of the room. The warmer the environment, the quicker the rise.

Make ahead option.

To make ahead the day of, the dough balls can be shaped, arranged in the baking tray, covered with lightly greased plastic wrap and immediately placed in the refrigerator. Don’t let them rise. They can rest in the refrigerator for 4 hours but up to 12 hours. They will rise a little bit in the fridge. When you’re ready, take the rolls out in time to come to room temperature, which can take anywhere between 1 to 1½ hours. Let them rise until puffy and doubled in size. Bake as directed in the recipe.

Measure flour the right way.

Understanding the importance of measuring flour by weight rather than volume is crucial for achieving accurate results in baking. Unlike other ingredients, flour can significantly change the overall structure, texture and quality of your baked goods, especially bread. This introduction sets the stage for why weight matters when working with flour. 

Best practice for measuring flour with/without a scale

Read all about my expert tips in my blog post How to Measure Flour. My number one tip is get a scale. It takes away the guessing game and gives you consistent results every single time. Shop my exact kitchen scale for baking here. (Affiliate link)

Soft Dinner Rolls.

Can I mix the dough by hand?

You can easily make dinner rolls without a stand mixer but be prepared to work your arms! Once you’ve mixed the ingredients together to form a dough ball, knead with dry hands for 8-10 minutes until smooth, soft and tacky but not sticky. Dust with flour as needed.

Where is the best place to let my dough rise?

The ideal environment for bread to rise is in a warm spot, around 70°F to 80°F / 21°C to 26°C. Most kitchens are drafty and not this warm, which affects the time it takes for your dough to rise. 

What if my kitchen is not warm enough?

Here’s what I suggest you do: place the bowl (wrapped loosely with plastic wrap and a tea towel on top) inside the oven with the door closed. Of course, the oven needs to be turned off. A microwave works well too. The small enclosed environment is generally warmer and does the trick. Depending on the warmth of the room, it may take more or less time for the dough to rise. Always keep an eye on the overall growth. “Doubled in size” is the best indication for the next steps! 

Watch the full recipe tutorial on YouTube.

Expert tips for making soft dinner rolls.

Do not move the rolls

Now that I have your attention, let me explain. In the second rise when the dough balls are rising in the baking pan, they will get puffy and expand. If you try to move or re-shape the balls in any way once they’ve grown, they may deflate a little. Arrange them in the pan and let them be.

Do not rush the rise

If the dough doesn’t have enough time to rise, they won’t reach their fullest, fluffy potential. Follow the recipe directions for best results.

Shape and divide properly

Please see my step-by-step photos how to shape the dinner rolls below. The best practice for making dinner rolls is using a scale to weigh each dough ball. You can eyeball this process but if you notice the dough balls are significantly uneven, use a scale. We don’t want people fighting over which roll is the biggest and we definitely don’t want unevenly baked rolls. 

What is the best pan to use?

You can use any non-stick pan you have on hand, preferably 9″x13″ size. This size fits all 12 dinner rolls perfectly snug. If you double my recipe, a half sheet pan works great. Glass is a very poor conductor of heat and I do not recommend it when making any type of bread. I love my non-stick baking pans from USA Pans. I use it for all my focaccia recipes too. Shop my exact 9″x13″ Baking Pan here (Affiliate link) 

How to shape the dough.

Shaping dinner rolls is very simple and straightforward. The first step is to divide the dough. The best practice is to use a scale to equally weigh each ball. You can eyeball this process but if you notice the dough balls are significantly uneven, use a scale. Do this by placing all the dough on the kitchen scale and dividing that number by 12.

Step 1

Weigh the dough balls, about 65g each. Working with one ball at a time, use your fingertips to gently flatten into a square. Then, grab the four corners and pinch the seams together at the top.

Step 2

It will resemble a cute dumpling.

Step 3

Flip the ball seam side down and with the back of your palm, use the resistance of the surface to move in a circular motion. This smooths out the round shape.

Step 4

Repeat until all the dough pieces are rolled. Cover loosely with plastic wrap or a light tea towel until puffy and doubled in size.

How to make soft dinner rolls.

Make the dough

Using a stand mixer will make the bread making process a lot easier but feel free to knead by hand.

Let it rise

This is the initial, first rise where the yeast does its magic. You’ll know it’s ready when it’s doubled in size. 

Shape the dough

Refer back to my step-by-step photos and full video tutorial.

Let it rise

This is the second, final rise where the dough balls form their shape in the baking pan. You’ll know it’s ready the balls are fluffy and doubled in size.

Bake

Depending on the strength of your oven, these dinner take less only 20 minutes to bake!

How to store leftovers.

Although we recommend enjoying these baked rolls same day, they store well at room temperature for up to 2 days. Place leftovers in an airtight container or resealable bag to prevent them from drying out. Do not use a paper bag or towel. When properly stored, these rolls are extremely soft, even the next day. You may also freeze leftovers and reheat in the oven before serving.

Your feedback is valuable to us. If you have any questions, please let me know in the comments. If you try my recipes and love them, please take a moment to leave a five star review. Thank you for being part of the Bake Cook Repeat community! Don’t forget to follow us on FacebookInstagramPinterest and Subscribe on YouTube. 

Soft Dinner Rolls.

Soft Dinner Rolls

Patricia Martinescu from Bake Cook Repeat
Never buy dinner rolls again!! Easy 7 ingredient soft dinner rolls - they practically melt in your mouth. If you’re looking for a fool-proof recipe, this is the one. Typically served as a side dish, these buttery soft petite rounds are just as irresistible on their own. Brushed with honey butter and sprinkled with flaky sea salt, all I have to say is good luck eating just one.
5 from 11 votes
Prep Time 10 minutes
Cook Time 25 minutes
rise time 2 hours 30 minutes
Total Time 3 hours 5 minutes
Course Appetizer, Bread, Side Dish
Cuisine American
Servings 12
Calories 176 kcal

Ingredients


  • cups bread flour
  • 1 cup warm milk
  • 1 large egg for the dough
  • 1 large egg for the egg wash
  • 4 Tablespoons softened butter
  • 2 Tablespoons honey
  • 2 teaspoons instant yeast
  • 1 teaspoon sea salt
  • 1 Tablespoon unsalted butter softened, for coating the pan

For the tops:

  • 1/2 Tablespoon honey
  • 1 Tablespoon unsalted butter melted

Instructions
 

  • Read my expert tips and watch the video tutorial before beginning. I suggest using metric measurements and weighing the dry and wet ingredients for best accuracy.
  • Add the dry ingredients into a stand mixer bowl. Use the dough hook attachment.
    3½ cups bread flour, 2 teaspoons instant yeast, 1 teaspoon sea salt
  • While the mixer is on, slowly add the milk, egg, butter and honey. Knead on slow speed for about 5 minutes until the dry and wet ingredients are fully incorporated, smooth and combined. The dough will start pulling away from the sides of the bowl. It will feel tacky but not sticky. Oil your fingers to make handling the dough more manageable.
    Note: if you do not have a stand mixer, mix the ingredients together with a wooden spoon until combined. Then, transfer to a clean work surface and knead for 8-10 minutes until smooth, soft and elastic. Dust lightly with flour if the dough is too sticky.
    1 cup warm milk, 1 large egg, 4 Tablespoons softened butter, 2 Tablespoons honey
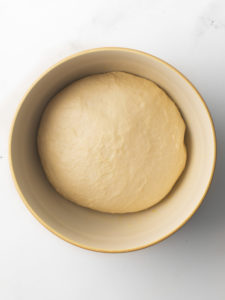
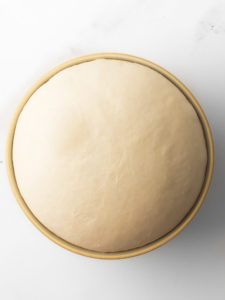
  • Remove the dough from the edges of the mixing bowl, form into a round shape and place back into the bowl. Lightly drizzle the bowl edges and dough with oil. This prevents the dough from getting stuck on the edges when rising. I usually let the dough rise in the mixing bowl but you can transfer to another bowl. Cover with plastic wrap and place in a warm spot for 1 to 1½ hours until doubled in size.
    Dough in mixing bowl.
  • Prepare a 9"x13" pan with parchment paper and spread softened butter on the entire inside surface. Set aside.
    1 Tablespoon unsalted butter
  • Punch the dough down and transfer to a clean, dry work surface. Do not add flour.
    Soft Dinner Rolls in baking pan.
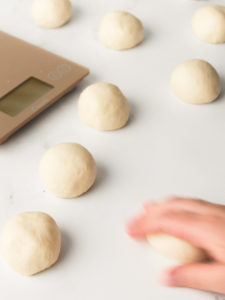
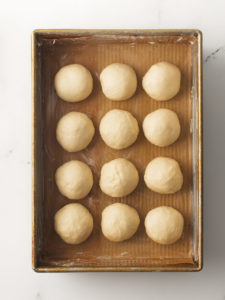
  • Divide the dough equally into 12 pieces, about 65g each. Use a scale for best results. Weigh the entire dough ball, then divide that number by 12.
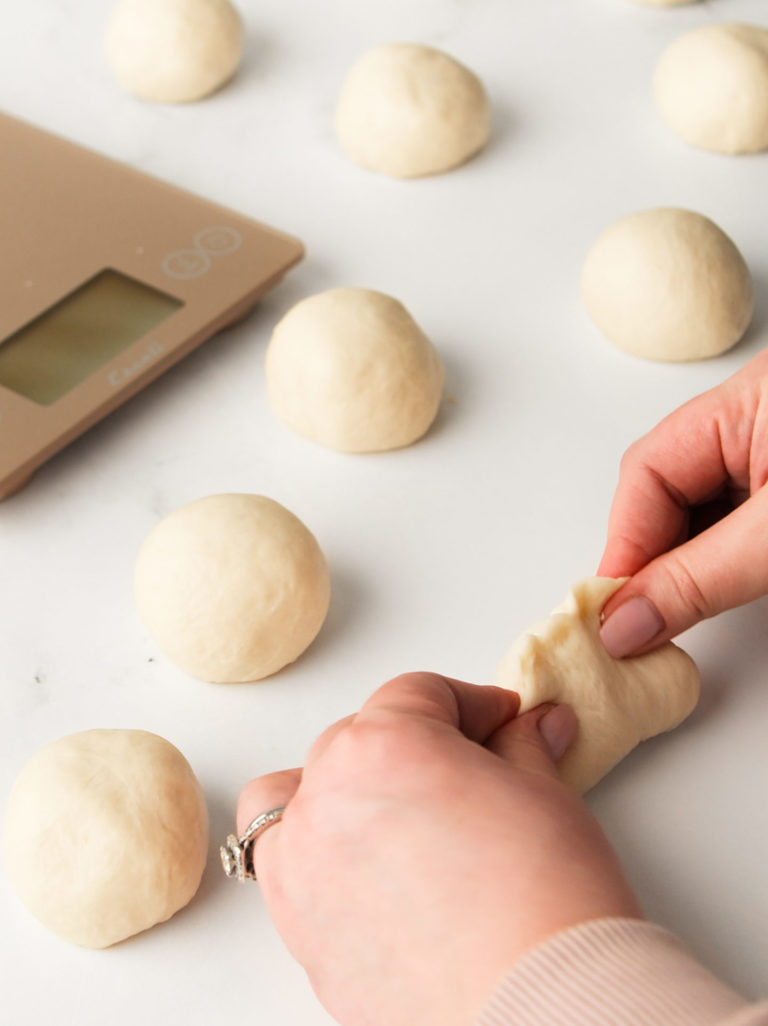
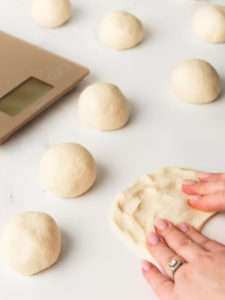
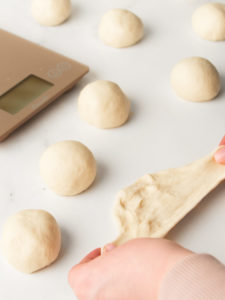
  • Working with one dough piece at a time, use your fingertips to gently flatten the dough into a rectangle.
    Soft Dinner Rolls.
  • Gently pinch a seal where the edges come together.
    Soft Dinner Rolls.
  • Flip the seam side down and use the back of your palm to shape and form into a round circle. Place each dough log into the loaf tin, seam side down.
    Soft Dinner Rolls.
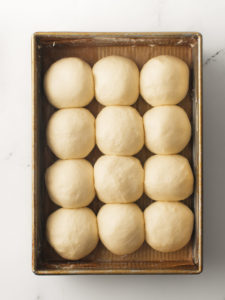
  • Loosely cover with plastic wrap and let it rise for at least 40 minutes but up to one hour, depending on the temperature of the room.
    Soft Dinner Rolls in baking pan.
  • In the last 15 minutes while the dough is rising, preheat the oven to 375°F.
    Soft Dinner Rolls in baking pan.
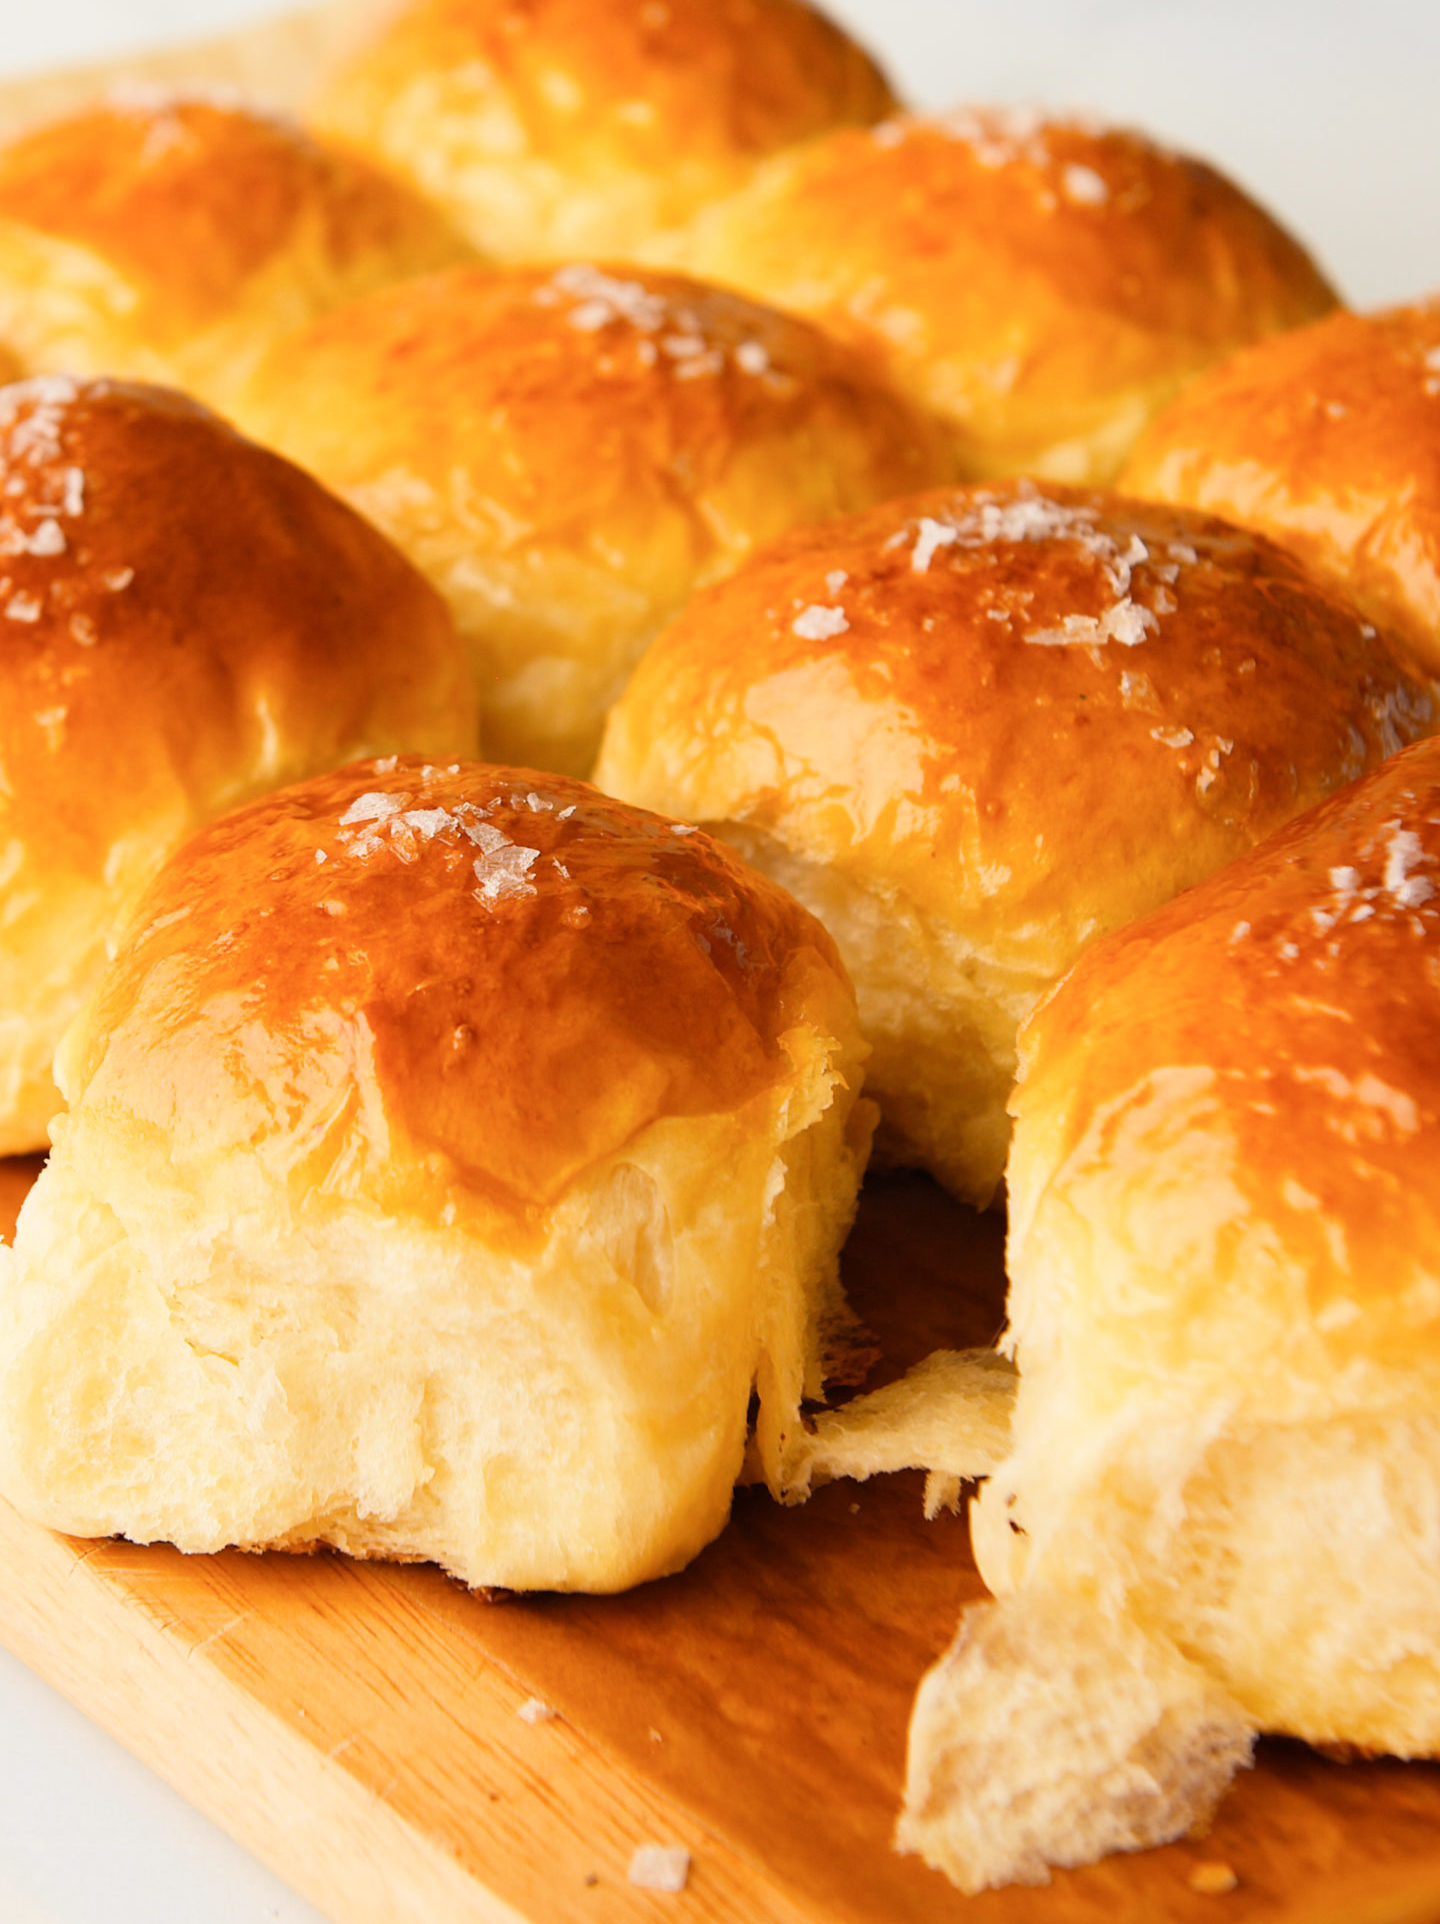
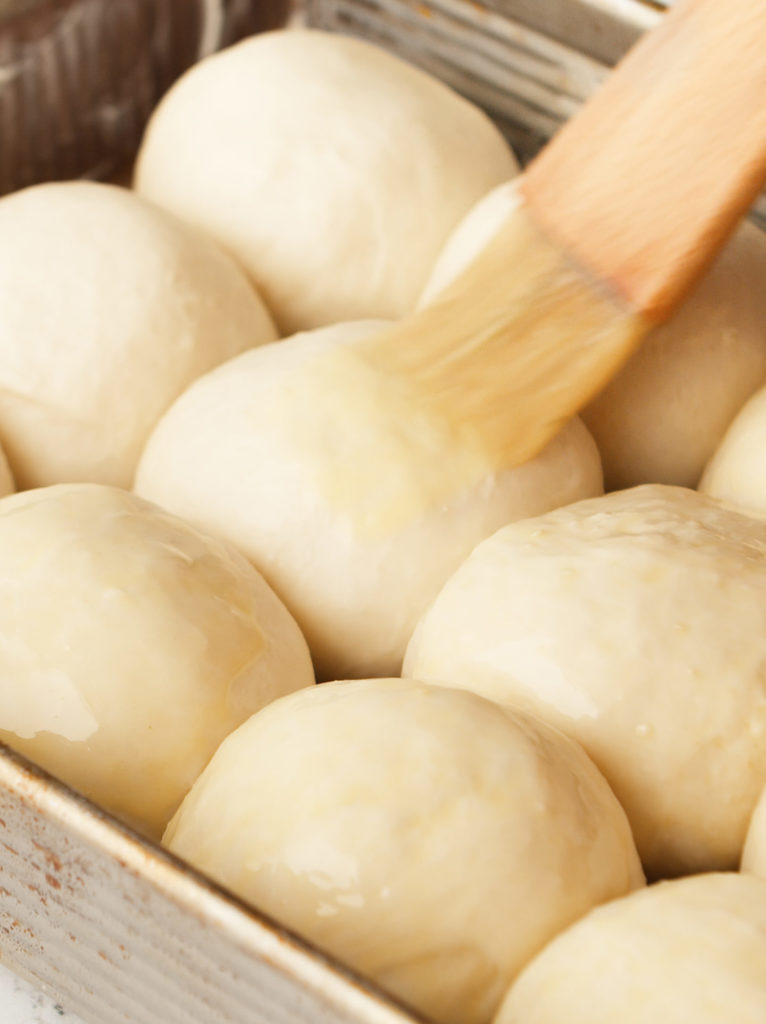
  • Remove the plastic wrap and brush the tops with egg wash. Bake on the center rack for 22-25 minutes until the tops are golden brown. Brush with melted honey butter over the tops. This helps keep the crust soft and is the perfect contrast between sweet and salty. Transfer to a rack to cool. This bread is very soft and fluffy. Best served immediately.
    1/2 Tablespoon honey, 1 Tablespoon unsalted butter, 1 large egg
    Soft Dinner Rolls.

Notes

  • If using active dry yeast, first measure 240ml or 1 cup of the warm water from the recipe in a wide mouth cup or bowl. Add in a teaspoon of sugar and sprinkle the yeast on top. Whisk together to combine and let it sit for 5-10 minutes until foamy and bubbly on top. Then, add to the dry ingredients, along with the remainder of the water and proceed with baking directions. For extended instructions, see Active Dry Yeast vs. Instant Dry Yeast blog post.
  • Although we recommend enjoying these baked rolls same day, they store well at room temperature for up to 2 days. Place leftovers in an airtight container or resealable bag to prevent them from drying out. Do not use a paper bag or towel. When properly stored, these rolls are extremely soft, even the next day. You may also freeze leftovers and reheat in the oven before serving.

Nutrition

Calories: 176kcalCarbohydrates: 32gProtein: 6gFat: 3gSaturated Fat: 1gPolyunsaturated Fat: 0.4gMonounsaturated Fat: 1gTrans Fat: 0.1gCholesterol: 19mgSodium: 201mgPotassium: 64mgFiber: 1gSugar: 4gVitamin A: 79IUVitamin C: 0.03mgCalcium: 9mgIron: 0.5mg

The provided nutritional value above is an estimate per serving. 100% accuracy is not guarenteed. Please see Nutrition Information Disclaimer in our Privacy Policy.

Nutrition Information Disclaimer
Keyword Appetizer, Sides, Soft Bread
Have you tried this recipe?Please leave a comment/review below!
4.83 from 12 Reviews

12 Comments

  • Jitesh

    5 stars
    These dinner rolls look amazing, is there a way to make them without egg? Could it be possible to increase the amount of butter?

    • Patricia

      Hi Jitesh, I have not tried this recipe without egg but I have made other bread recipes similar to my dinner rolls without it. The result is still delicious and soft. No need to increase the butter. Let me know if you try it!

  • Laura

    5 stars
    Would these make good hamburger buns? Maybe I could make 8 instead of 12 so the are closer to the standard burger bun size?

    • Patricia

      I think they would make wonderful hamburger buns! Be mindful to shape in the same was as my dinner rolls to maintain the typical high and round shape. Bake time may vary by a few minutes. I hope this helps. 🙂

  • Lavinia

    5 stars
    Once again another amazing bread recipe from Patricia. These rolls are honestly the best I’ve made. I’ve tried a few recipes, and this one is the topper. My 6 year old is my bread guy and he said these are SO good. We ate the whole batch in one sitting! They’re also perfect for sliders or sandwiches for kids lunches!

    • Patricia

      Thank you for such a lovely review, Lavi! We’re so happy to make things a little easier in the kitchen. 😉

  • Maria Cristina

    5 stars
    This was the first recipe I tried from Patricia’s blog. I was a little nervous about the process of forming the little balls but it turned out to be sooo easy! And so relaxing! The final result was divine.
    I recommend this from the bottom of my heart!
    I can’t wait to try more of these recipes!

    • Patricia

      Thank you for the lovely review, Maria! We hope you stay awhile and enjoy some more of our delicious recipes. Happy baking! 🙂

  • Amy

    5 stars
    This recipe and related directions were quite good, the rolls turned out just like the photos! I don’t have a stand mixer so could have used a bit more help with kneading instructions – but the result was super soft, flavorful rolls. They were a bit sweet for my taste, so I’d probably cut back on the honey glaze in the future, or maybe just use butter on half for those who want a more savory roll.

    • Patricia

      Hi Amy! Thank you so much for your lovely review! I will add a detailed section for an alternative method to mixing. 🙂

  • Dae

    5 stars
    I had to try these dinner rolls when I saw them posted on Instagram. They were so easy to make. I’m shocked at how fluffy they tasted. I didn’t think I could ever make bread this soft. Thank you for the amazing bread recipe again! You’re the bread queen.

Leave a Reply

Your email address will not be published. Required fields are marked *

Recipe rating