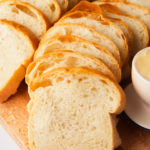
Sandwich Bread
This easy, soft sandwich bread recipe makes two perfectly golden loaves of white bread. Trust me, you're going to thank me later.
Ingredients
- 6½ cups bread flour
- 2 cups lukewarm water (may substitute with 1 cup of milk and 1 cup of water)
- 5 Tablespoons unsalted butter softened
- 2 Tablespoons honey
- 2½ teaspoons instant yeast
- 3 teaspoons sea salt
- 1 Tablespoon unsalted butter for brushing on the bread
- 1 Tablespoon unsalted butter for the loaf tins
Click between "US Customary" or "Metric" button above to switch between conversions. For precise results, it's recommended to weigh your dry ingredients using a digital scale in grams as measuring in cups can have uncertainties.
Instructions
Before you start
- I highly recommend using a kitchen digital scale for measuring flour and milk as both are easily over-measured. Use the toggle button in the ingredients section to switch between cups and grams. If you don’t have a scale, fluff the flour with a fork in its container, and then spoon it into the measuring cup before leveling off with a flat edge.
Prepare the dough
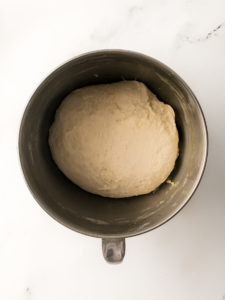
- Add the dry ingredients into the bowl of a stand mixer. Use the dough hook attachment.Note: Toggle between US customary and metric buttons above in the ingredients section for exact flour weight in grams.6½ cups bread flour, 2½ teaspoons instant yeast, 3 teaspoons sea salt
- While the mixer is on, slowly add the warm water, honey and butter last to the yeast mixture. Knead on slow speed for 5-7 minutes until the dry and wet ingredients are fully incorporated, smooth and combined. The dough will start pulling away from the sides of the bowl. The dough will feel tacky but not sticky. Oil your fingers to make handling the dough more manageable.2 cups lukewarm water (may substitute with 1 cup of milk and 1 cup of water), 5 Tablespoons unsalted butter, 2 Tablespoons honey
First rise
- Remove the dough from the edges of the mixing bowl, form into a round shape and place back into the bowl. Lightly drizzle the bowl edges and dough with oil. Cover with plastic wrap and place in a warm spot for 2 hours until doubled in size. Note: This first rise is called bulk fermentation. It allows the yeast to ferment the dough, developing flavor and helping the gluten structure form.
Shape the dough
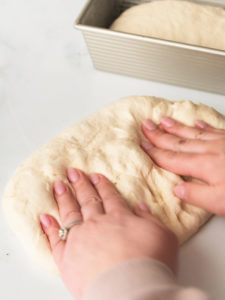
- Punch the dough down and transfer to a clean, dry work surface. Do not add flour.

- Divide the dough equally in half, about 670g each. Use a scale for best results. Weigh the entire dough ball, then divide that number by half.
- Flip over so the smoother side is down. Working with one dough piece at a time, use your fingertips to gently flatten the dough into a rectangle, about the same width as the loaf tin.
- Roll the portion closest to you up and away from you. Then, fold the sides towards the center and continue rolling away from you, forming into a small log shape. Use the resistance of the surface to pull the dough tightly together. Gently pinch a seal where the edges come together.
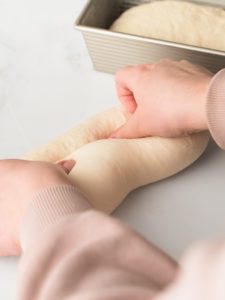
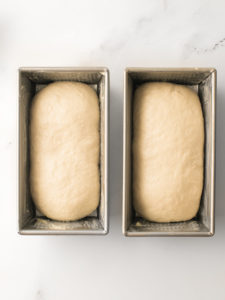
- Prepare each 1lb. loaf tin by spreading softened butter on the entire inside surface. Place each dough log into the greased loaf pan, seam side down. Gently press down the surface of the dough into the loaf tin to release any surface bubbles.1 Tablespoon unsalted butter
Second rise
- Loosely cover the top of the dough in the prepared loaf pan with plastic wrap and let it rise for at least 40 minutes but up to one hour, depending on the temperature of the room. The dough will rise above the rim of the pan.Note: This second rise is called proofing. It occurs after the bread is shaped. This shorter rise allows the dough to develop a little more volume and improves the final structure.
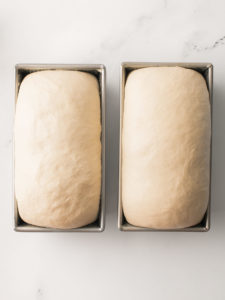
- While the dough is rising in the loaf tins, preheat the oven to 350°F / 176°C.
Bake
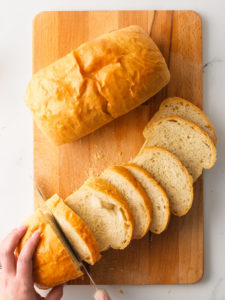
- Remove the plastic wrap and bake for 40-42 minutes until deeply, golden brown. Brush with melted butter over the tops of the loaves. You may also brush some honey for sweetness too. This helps keep the crust soft and adds a finishing touch. Leave the bread in the tin for at least 10 minutes, then transfer to a cooling rack.1 Tablespoon unsalted butter

- This bread is very soft and fluffy. Slice when completely cool for best results and store leftovers at room temperature for up to 3 days.
Video
Notes
- Measure flour by weight in grams instead of cups. Shop my exact scale here. (affiliate link) If you don't have a scale, fluff the flour with a fork in its container, and then spoon it into the measuring cup before leveling off with a flat edge. Do not scoop directly into the flour bag. This will add way too much flour to the batter, making it dry!
- Store at room temperature: This bread is super soft, even the second day. Generally speaking, homemade bread doesn't last longer than a few days (yes, it's a short shelf life!) because it doesn't contain any preservatives. Store leftovers tightly closed in plastic wrap, a brown paper bag or Ziplock.
- Instant yeast can mixed directly with dry ingredients and active dry yeast must be dissolved in warm liquid first to be "activated" or proofed before use. First, heat up your milk or water until its lukewarm, about 110°F. Stir in the active yeast and a pinch of sugar. Let it sit for 5-10 minutes until its foamy or bubbly. For extended instructions, see Active Dry Yeast vs. Instant Dry Yeast blog post.
Nutrition
Calories: 257kcalCarbohydrates: 42gProtein: 7gFat: 6gSaturated Fat: 4gPolyunsaturated Fat: 1gMonounsaturated Fat: 2gTrans Fat: 0.2gCholesterol: 14mgSodium: 468mgPotassium: 76mgFiber: 2gSugar: 2gVitamin A: 164IUVitamin C: 0.02mgCalcium: 11mgIron: 1mg
The provided nutritional value above is an estimate per serving. 100% accuracy is not guarenteed. Please see Nutrition Information Disclaimer in our Privacy Policy.
Nutrition Information Disclaimer Have you tried this recipe?Please leave a comment/review below!